Purpose of this blog

Dmitry Yudo aka Overlord, jack of all trades
David Lister aka Listy, Freelancer and Volunteer

Sunday, February 2, 2014

Libya's Death Star

On the morning of the 19th of March 1987, the sun began to flood the desert around Bir Kora in northern Chad.  It revealed a parched desolate landscape with no vegetation at all, just reddened or ochre rocks.
It also revealed a Libyan tank battalion resting in Laager.  The Libyans had set out the day before from the fortified camp at Wadi Doum with the mission of retaking the town of Fada.  The Libyans hadn't deployed any scouts overnight, and little did they know the Chadian forces had found them and surrounded them.
Libyan Camp, photographed by French air force in 1986
Fada had fallen to the Chadian forces a couple of months previously.  The planned recapture of Fada was the latest in a series of battles fought between Libya and Chad over the previous 9 years.
Libyan forces had copied the Warsaw Pact doctrine, and purchased all the Soviets latest equipment with oil money.
Set against that you had the fierce, wiry desert tribesmen who were almost untrained. As an example the Chadian armies Special Forces received only six weeks of training.
The Libyan forces had set up a base at Wadi Doum.  The base was heavily fortified around a long runway, which ran between two hills.  On the top of those hills was a Soviet “Spoon Rest” radar system which controlled an entire SA-6 surface to air missile battery.  Over 5000 men were defending this complex loitering in the emptiness of the desert. One US intelligence official described it as equivalent of the Death Star from Star Wars.
French Air force photograph of an SA-6 at Wadi Doum
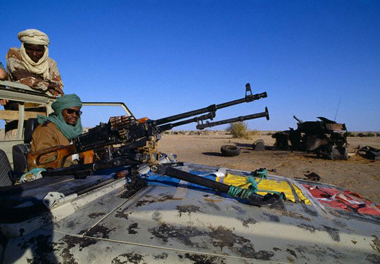
About 400m from the Libyan T55's lay a rocky hill with its sides covered by sand.  Hidden at the top of the hill was a Toyota pickup truck.  The Chadian soldier in the back was one of the few with a degree of training, as his Toyota mounted one of the latest French supplied weapons, a Milan guided anti-tank missile.
On a signal from their commander the Milan gunners launched a volley at the Libyan tanks.  Some missiles hit and some missed.  When they did hit the missiles easily punched through the tanks armour, often causing the turret to blow off.  The Libyans began to return fire although their rounds had little effect, as they were trying to hit a man sized target at 400m. Their shells peppered and blasted the rocks the Chadians were using as cover.
The Libyan commander ordered most of his forces to shift over to face the direction of the incoming fire.
As they did so the Chadians launched their real attack.  More Toyotas charged towards the weakened Libyan rear flank.  The few tanks left to defend it desperately tried to track their guns round onto the Toyota pickups which were moving at over 70mph across the fine sand.  Some of the T55's managed to get their guns on target, and even a near miss would smash the speeding pickup.  Unfortunately the Libyan numbers were too few to prevent the attack from breaking through the line.
The Libyans tried to shift some of their tanks back to face the threat, but they quickly bogged down in the fine talcum powder like sand.  Rampaging around inside the Laager the Chadians began to engage the Libyans with small arms, LAW’s (Light Anti-Tank Weapon) and RPG’s (Rocket Propelled Grenade).  Some were launched at such close range that the rockets would strike the tanks and the explosion would kill the firer.
The Libyan commander panicked and radioed to Wadi Doum for help, but before the relief force could set out the battle was over with a crushing victory to the Chadians. A few Libyans managed to flee back down the road towards Wadi Doum.

The tactics the Chadians had used were identical to ones the desert tribes had been using for centuries only replacing horses and camels with Toyotas.  Yosko Hassan, Assistant Commander for the force said to reporters later:
"We Chadians, we had nearly nothing. Our army is a young one, with very little means. We tried to act within our means."
 The fleeing Libyans met the relief column 12 miles back up the track, and the relief force took up a similar position overnight with a battery of six 122mm artillery guns.  Further up the track were a number of tanks. On the morning of the 20th the Chadians repeated their attack in almost exactly the same way.  This time the rout was even more pronounced. The Libyans fled with almost no fighting with the artillery not even firing a shot, and eleven T55's were abandoned where they sat, the keys still in the ignition.
The panicked fleeing troops reached Wadi Doum air base, and warned the defenders that the Chadian army was on the way.  The defenders ignored the dire warnings and continued with their daily routine. Some tended the small irrigated gardens which were the only green plants for hundreds of miles.  Others made plaques with passages from Qaddafi's green book or the Koran.  The words were made by gluing stones and pebbles to boards.
They defenders thought they were safe inside two rings of defensive lines and minefields. The approaching dust clouds were thought by some to be their missing troops returning. On the 22nd the Chadians attacked, quickly overwhelming the outer defensive line.
Wadi Doum under French Air attack in 1986
Knowing about the minefields some Chadian soldiers thought their Toyota's could skip right past the explosions unharmed, about 12 Toyotas tried this but were quickly destroyed.  The rest of the Toyotas formed up and charged down the road into the main gate.
The Libyans panicked, and despite having overwhelming numbers and fire-power they fled with no attempt at a coordinated fight.  The Chadians rampaged through the camp, occasionally pockets of resistance would be found and quickly destroyed by the Toyota borne Chadian army.  Within an hour the runway had been captured, and by the early evening the rest of the base was also captured.
Searching the base the Chadian army found massive quantities of weapons.  There were underground storage facilities holding weapons and ammunition, one had twelve brand new unused T2 tanks.  Outside in the vehicle park were the West German Faun tank transporters that had brought them to this base. Numerous aircraft were captured undamaged as well, although the assault had burned some out.  The prize was the full Soviet SA-6 battery, of a new type not known about by NATO.  After French requests the battery was transported to the south and well out of range of Libyan retaliation.
The Libyans began bombing the base in an attempt to destroy some of the $1 Billion worth of equipment captured by the Chadians.  One L39 Albatross flew to low and was shot down by a Stinger missile.  From then on the Libyans flew at high altitude, and although the Chadians fired more Stingers the Libyans were well out of range.  From that high altitude though, the bombing was largely ineffective.

The Libyans had about 1300 soldiers killed, and 500 captured. The Libyan regional commander, Colonel Khalifa Hastar was also captured, and his deputy Colonel Gassim abu Nawar was killed in the assault.  The Libyans also lost hundreds of tanks, APC's and trucks.
The Chadians lost 29 killed and 58 wounded.

But there is more to the story.  The few Libyans that managed to flee the battle, ran to the next Libyan fortification at the town of Faya-Largeau.  This was the home town of the Chadian President.
Some Libyans ran into their own minefields and were stranded and unable to move.  They were captured along with the city by the Chadian army on the 27th.
The forces of Chad didn't need to fire a single shot, as the Libyans ran before they arrived.

This part of the Chadian-Libyan conflict became known as the Toyota War, for obvious reasons.

Saturday, February 1, 2014

[WoTB] World of Tanks Blitz: Tanks and Tablets

Popularity of the original World of Tanks did not leave aspiring game development studios indifferent. Since 2011 WoT-resembling (in terms of gameplay) products started to rocket on different platforms including mobile - smartphones and tablets. Naturally Wargaming.net is not going to disappoint their customers and is going to come up with their decent version of tanks for tablets.
Developing games for iOS and Android platforms is a very special case that requires very dedicated and focused professionals. Wargaming didn't have that kind of expertise until recently.

DAVA, a Belarusian development studio, was founded in March, 2008 in Minsk. The guys chose their specialization right away. They decided they would be developing apps for iOS. The date of founding the studio is close to the date of App Store creation (July 10, 2008). So, we may say that DAVA is a peer of the most popular iOS apps store.
While others were examining the newly appeared service, the young studio was already developing products for it and was among the pioneers on the newly-formed market.
DAVA had for co-founders: Andrew Karpiuk, Vitaly Borodovsky, Dmitry Bobrovnichiy, and Alexander Fomenko; as well as six key soldiers: Ivan Petrochenko, Alexey Prosin, Stepan Drozd, Kirill Poliakov, Victor Kleschenko, and Alexey Alexeev. This were the “bones” of the young development studio. Nobody in Belarus had developed anything for iOS befor DAVA was founded. And obviously WoT Blitz is not the first product the team has worked on. They had produced quite a few games and apps (with over 10 mln downloads and over a million purchases) before they started working on WoT Blitz. The team used to work as a subcontractor for Electronic Arts, iWin, Freeverse, and other publishers. The audience of DAVA own product users is about 9 million with a lot of apps and games to appear among TOP100 in free and grossing charts.

Some of the DAVA products include:

Modern Weapons: Small Arms (encyclopedia)


Jewel Quest Mysteries


Space Storm


Wargaming has been in touch with DAVA for quite some time. There even were a few ex-Wargamers working for DAVA. The acquisition finally took place in 2011. The first major game project - World of Tanks Blitz - was started in spring 2012 (first prototype) and officially greenlit in December 2012.

The mobile department of Wargaming currently consists of 3 independent teams:
-       The WoT Blitz team distributed in Minsk and a few Ukrainian cities.
-    Framework team (cross-platorm game engine development)
-       The Service Apps team developing apps assistants World of Tanks and World of Warplanes

Vitaly Borodovsky - tech director
UX/UI design in progress
Designing maps for Blitz
GD is thinking over a new feature - agile board in the background
As for the game, WoT Blitz, it has been demoed at multiple gaming shows throughout 2013 and early 2014, including public gaming areas during G-Star 2013 in Korea and Taipei Game Show 2014, which means that the game in nearing closed beta with iOS release scheduled for first half of 2014.

A couple of new screenies below.

The map is called "Mines". Should be recognizable 

From another perspective with HUD

Another map - Copperfield

Tuesday, January 28, 2014

[WoT] 0.8.11 is Coming

How do you like the upcoming 0.8.11 update for World of Tanks?

Any major concerns or ideas?

WT E100 will lose 200HP btw. 

Sunday, January 26, 2014

Erfolgreiche Flucht!

On September the 5th, 1940, a ME109 was in a dive over England, with a Spitfire behind it. The ME109 pilots name was Franz Von Werra, and things were going badly. Just a week earlier he had returned from a sortie and claimed 9 RAF kills in that single mission, even though he hadn't a shred of proof. He'd been lauded across the German press for this feat. The fame had been welcome for Von Werra, who had been born in Switzerland to an impoverished noble family. Now he was about to start a true adventure which would rightfully make him famous, not the imaginary one which he had relied upon until then.

Escorting a bombing raid against Croydon, Von Werra had seen RAF fighters attack the bombers, and following the lead of his squadron commander they had prepared to dive on the RAF. As they committed themselves another flight of RAF Spitfires bounced them. In the ensuing dogfight Von Werra's ME109 had its engine damaged (some sources claim by frenziedly fire). As he dove away one of the spitfires latched onto his tail and followed him down pumping bursts into his stricken plane. As he roared over searchlight detachment the British soldiers had joined in firing Lewis guns at the ME109. Von Werra arrived in England, unhurt, only a few fields later, near a place called Loves Farm.

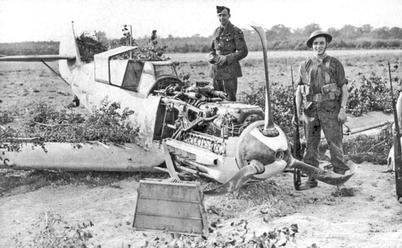
Von Werra's ME109
He was quickly taken prisoner by local farm workers and the cook from the Searchlight detachment, and was handed into the police force and then the army. He joined the rapidly growing umber of German airmen who were POW's of the British. During interrogation the British checked the details of Von Werra's story, and found the 9 kills to be false. The BBC made great work of the propaganda victory. However in an oddity of life, the Germans hearing the denunciations against Von Werra's tally thought it must be true and so he was credited with all the kills, this action got Von Werra awarded the knights Cross.


Meanwhile in the UK Von Werra was now at Camp No1 near Grizedale Hall in the Lake District. Where he hatched the first of many escape plans. The POW's were exercised outside the camp each day, and at the same point in the route the excursion party would pause to allow the POW's to rest. Von Werra proposed to simply slip over the wall at that location and escape. With the support of the camp he started making plans. First the senior German officer in the camp asked the British to change the time of the exercise period. With the excuse it was interfering with the German's educational activities the walk was dropped from the morning to the mid afternoon. This would mean Von Werra would only have to avoid capture for a few hours before night. Secondly a German was appointed to cause a small distraction amongst the guards.

On Monday the 7th of October the plan was put into action. The roads in the area were utterly deserted, but as fate would have it a Greengrocer's cart was approaching the corner when the Germans arrived.
The plan was put into action, as the German selected for the Decoy stepped out of line to talk to the British NCO leading the party, he was immediately yelled at and told to return to his place. Von Werra's plan was failing, as he didn't have distraction, and soon they'd move off again. Then the cart and horse passed by, and Von Werra spotted it would block the British guards line of sight to him and at the right moment he rolled over the stone wall. Lying in the shade of the wall he waited for yells from the guards. None came, eventually the party moved off with him unmissed! He was free!

Von Werra was however free in in the Lake District in Autumn. Three nights later he was sheltering in a small stone shed on the hills when two Shepard's in the Home Guard found him. As he was led away in captivity Von Werra suddenly threw his weight about and knocked the two men over and took off into the darkness. He easily outdistanced the two old Home Guards. With a rough location the net tightened, and eventually on the night of the 12th Von Werra was recaptured by a search party whom had just retired for the night to the local pub. When one man saw a lone figure in the distance, the party turned out and combed the area. Eventually Von Werra was found lying almost totally submerged in some mud.

After a period in solitary confinement Von Werra was transferred to a new camp, Hayes Camp, in Swanwick, Derbyshire. Here he worked with a number of other prisoners to dig an escape tunnel. On the 20th of December Von Werra and his fellow escapee's broke out. A diversion was provided by Germans singing loudly. The song they chose was a German folk song "Muss I denn, muss I denn, zum Stadtele hinaus", which translates as "I must away into the great wide world".
The next morning wearing his Luftwaffe flying uniform he claimed to be a Dutch pilot whose bomber had been shot down at a local railway station. Eventually through guile he managed to convince the station staff of his identity. After a phone call a car was dispatched from the local airbase, RAF Hucknall, to pick up Von Werra. When he arrived on the base he was questioned by a very suspicious squadron leader. While the Squadron leader attempted to contact Von Werra's invented unit and airbase, Von Werra excused himself to visit the toilet. Once out of sight he made a break for it, looking for a plane to steal and fly back to Germany! As luck would have it he climbed over a security fence and ended up in a Rolls Royce factory. A group of civilian mechanics approached and assumed he was an Air Transport Auxiliary pilot here to ferry a fighter plane to a front line unit. So after getting him to sign into the visitors book he selected a fighter.

But the engine wouldn't start. The mechanics went away to find a starter trolley to get the Merlin engine to turn over, while Von Werra sat in the cockpit, head down, familiarising himself with the controls. When he looked up he saw the squadron leader with a revolver aimed firmly at his face.
In January 1941 Von Werra was moved to another camp. This one was quite a bit further away, in Canada. The British assumed it would be extremely difficult for a German POW to escape across the Atlantic.
The Germans were shipped safely with a large escort, and when they had been disembarked they were placed upon a train. Each carriage had a couple of guards in it, but was otherwise a normal carriage. As the train moved across the Canadian countryside Von Werra worked at freeing the window he was sitting next to. It had been iced up by the harsh Canadian winter. Eventually he had it free, and at an opportune moment he signalled one of his fellow Germans, who stood up and started to fold his coat, blocking the guards view. At which point Von Werra went out the window of the moving train. After trudging through the snow he came to a river, which was partially iced up. The centre of the river was still flowing water. To get wet would have been deadly. Luckily Von Werra managed to find and steal a rowing boat and so crossed into the United states. Which at that time was still neutral.

Von Werra turned himself into the US police and was charged with entering the United States illegally. He contacted the German consul in the US, and while the Federal government was deciding what to do with his case, Von Werra had been smuggled out of the country, and through several other neutral countries until he returned to Germany.
Publicity photograph taken by the Germans of Von Werra and his pet Lion cub Simba
For his exploits he was awarded the Iron Cross. Von Werra was also asked to inspect the German POW arrangements for the British. He said upon viewing the conditions "Better to have been captured by the British than the Germans!". It was his comments that lead to the massive improvement in POW conditions for Western allies.
Von Werra returned to flying, and was lost over the North sea to mechanical failure on a training flight.

Wednesday, January 22, 2014

[WoT] Nation vs Nation

Well, guess, you've heard that. What do you think of the idea - having factional battles in World of Tanks (and may be some other our games). For now, as a part of random battles - USSRvsGermanyvsUSvs...

Will this give us a definitive answer: are the devs biased or not and which tanks are the best? :)

Sunday, January 19, 2014

The Secret Service Yacht Club

From today Scott Wichall has volunteered his time free of charge for the daunting task of proof reader for these articles. So my Thanks to him.

On 4th of January, 1890, a plantation owner in Sri Lanka called John Agar was celebrating the birth of his 13th child.
The new born son was called Augustus Agar, and he would grow up to be one of the Royal Navy’s notable officers. Augustus' mother died shortly after he was born. Augustus was sent away to boarding school in Britain, but at the age of 12 his father died whilst he was in the UK. Now orphaned Augustus and his elder brother decided he should join the Royal Navy.  Sponsored by a friend of the family Augustus joined the Royal Navy in 1904, and was sent as a cadet to an old wooden Man-of-war which was being used as a training ship.
His first taste of action was on a Pre-Dreadnought supporting the Gallipoli landings. After the failure of that campaign Agar's ship was back in the UK. None of the Royal Navy’s Pre-Dreadnoughts were ordered to join the grand fleet for the battle of Jutland, so Agar had to watch as the Fleet steamed out of harbour without him. He was then transferred to another Pre-Dreadnought cruiser as the Executive Officer. This cruiser was stationed in Murmansk to keep the sea lanes to Russia open. He arrived there in March 1917, as the Russian Revolution swung into life.
HMS Hibernia, Agar's ship during the Gallipoli landings
HMS Iphigenia, Agar's ship at Murmansk
A Russian protected cruiser called Askold was based at Murmansk.  Agar had served alongside her against the Turks and knew several of the officers. When the Ship was grasped by mutiny and the officers arrested he could do nothing to help. Equally he could see the supplies being delivered by the British were being used by the Bolsheviks as well. At the start of 1918 the Royal Navy withdrew from the Russian ports, and Agar transferred to Coastal Motor Boats (CMB's).

 These were small 40 foot plywood shells, resembling a canoe. The CMB had a hydroplane and an aircraft engine to power it, due to this they could reach speeds of 45 knots. Each craft had three "cockpits" for the three man crew. Although they often had a Lewis gun fitted to them, the main armament was a single torpedo in a trough at the back of the boat. The torpedo was shoved out of its trough, tail first, by a cordite charge. The CMB then had to turn hard and fast to avoid being hit by its own torpedo.  Agar served in these boats until the end of the war, even taking part in the Raid on Zeebrugge.
The end of the war found Agar and the CMB's at Osea in Essex, with nothing in the immediate future. Agar had by now reached the rank of Lieutenant.

The Secret Service approached Lt Agar. Their problem was a British spy, a master of disguise, was in Bolshevik controlled Russia. Although the Bolshevik secret police, the Cheka, were looking for him they couldn't catch him. They had however caught seven of his couriers who had been carrying vital intelligence. Each courier had died in a messy and unpleasant manner. The British Secret Service wanted Agar to take a pair of CMB's to the deserted yacht club at Terijoki on the gulf of Finland to act as transport for couriers, and later in the year pick up their spy. The CMB's would theoretically be entirely under the control of the Secret Service. The mission was considered extremely hazardous, and only unmarried volunteers were called for. The crews of the CMB's would wear plain clothes, although they did have Royal Navy uniforms on board in case of capture. This was a futile gesture considering the situation. Lt Agar agreed and set about preparing his crews and two boats CMB4 and CMB7.

When the crews and boats were shipped through Sweden, Swedish Customs started asking searching questions. As the crews were in plain clothes, they claimed the boats were the latest type of pleasure boat, and the crews were salesmen. It's a very good thing the Customs officials didn't open the boxes listed as spare parts, as those contained the Royal Navy uniforms and Lewis guns. It should be noted that the CMB's were not going to carry torpedoes although the launching gear was stored with the Lewis guns.
There is a line of forts protecting the Russian base of Kronstadt. On June the 15th 1919, shortly after Lt Agar had arrived there were plans by the forces in them to revolt against the Bolsheviks. These have often been referred to as White Russians, but this was not the case. The area had its own identity, the Ingermanlanders wanted nothing more than independence, like Estonia and the other countries in the region had gained from Russia. The forts, and some local forces were drawing up plans to mutiny and try to seize their chance. However the Commander of the fort Krasnaya Gorka came under suspicion, and a Commissar arrived to detain him. With no other choice the fort rebelled. The early rebellion destroyed any chance of a coordinated uprising, and ended the Ingermanlanders dreams of independence.
The Bolsheviks were quick to respond, dispatching a pair of battleships to bombard the fort. After an initial savage beating the bombardment had tailed off towards the end of morning. The barrage recommenced about 1100.

11 Miles away at Terijoki, Lt Agar and several others were watching these goings on from the church above their base. Knowing the Estonian army were forming an attack plan to help the forts Lt Agar wondered if blowing the destroyers up might give the forts defenders a breathing space, allowing the Estonians to launch their attack. After Lt Agar had travelled to see the Royal Navy’s Baltic Fleet and spoken to its Commander, he was given a pair of torpedoes.
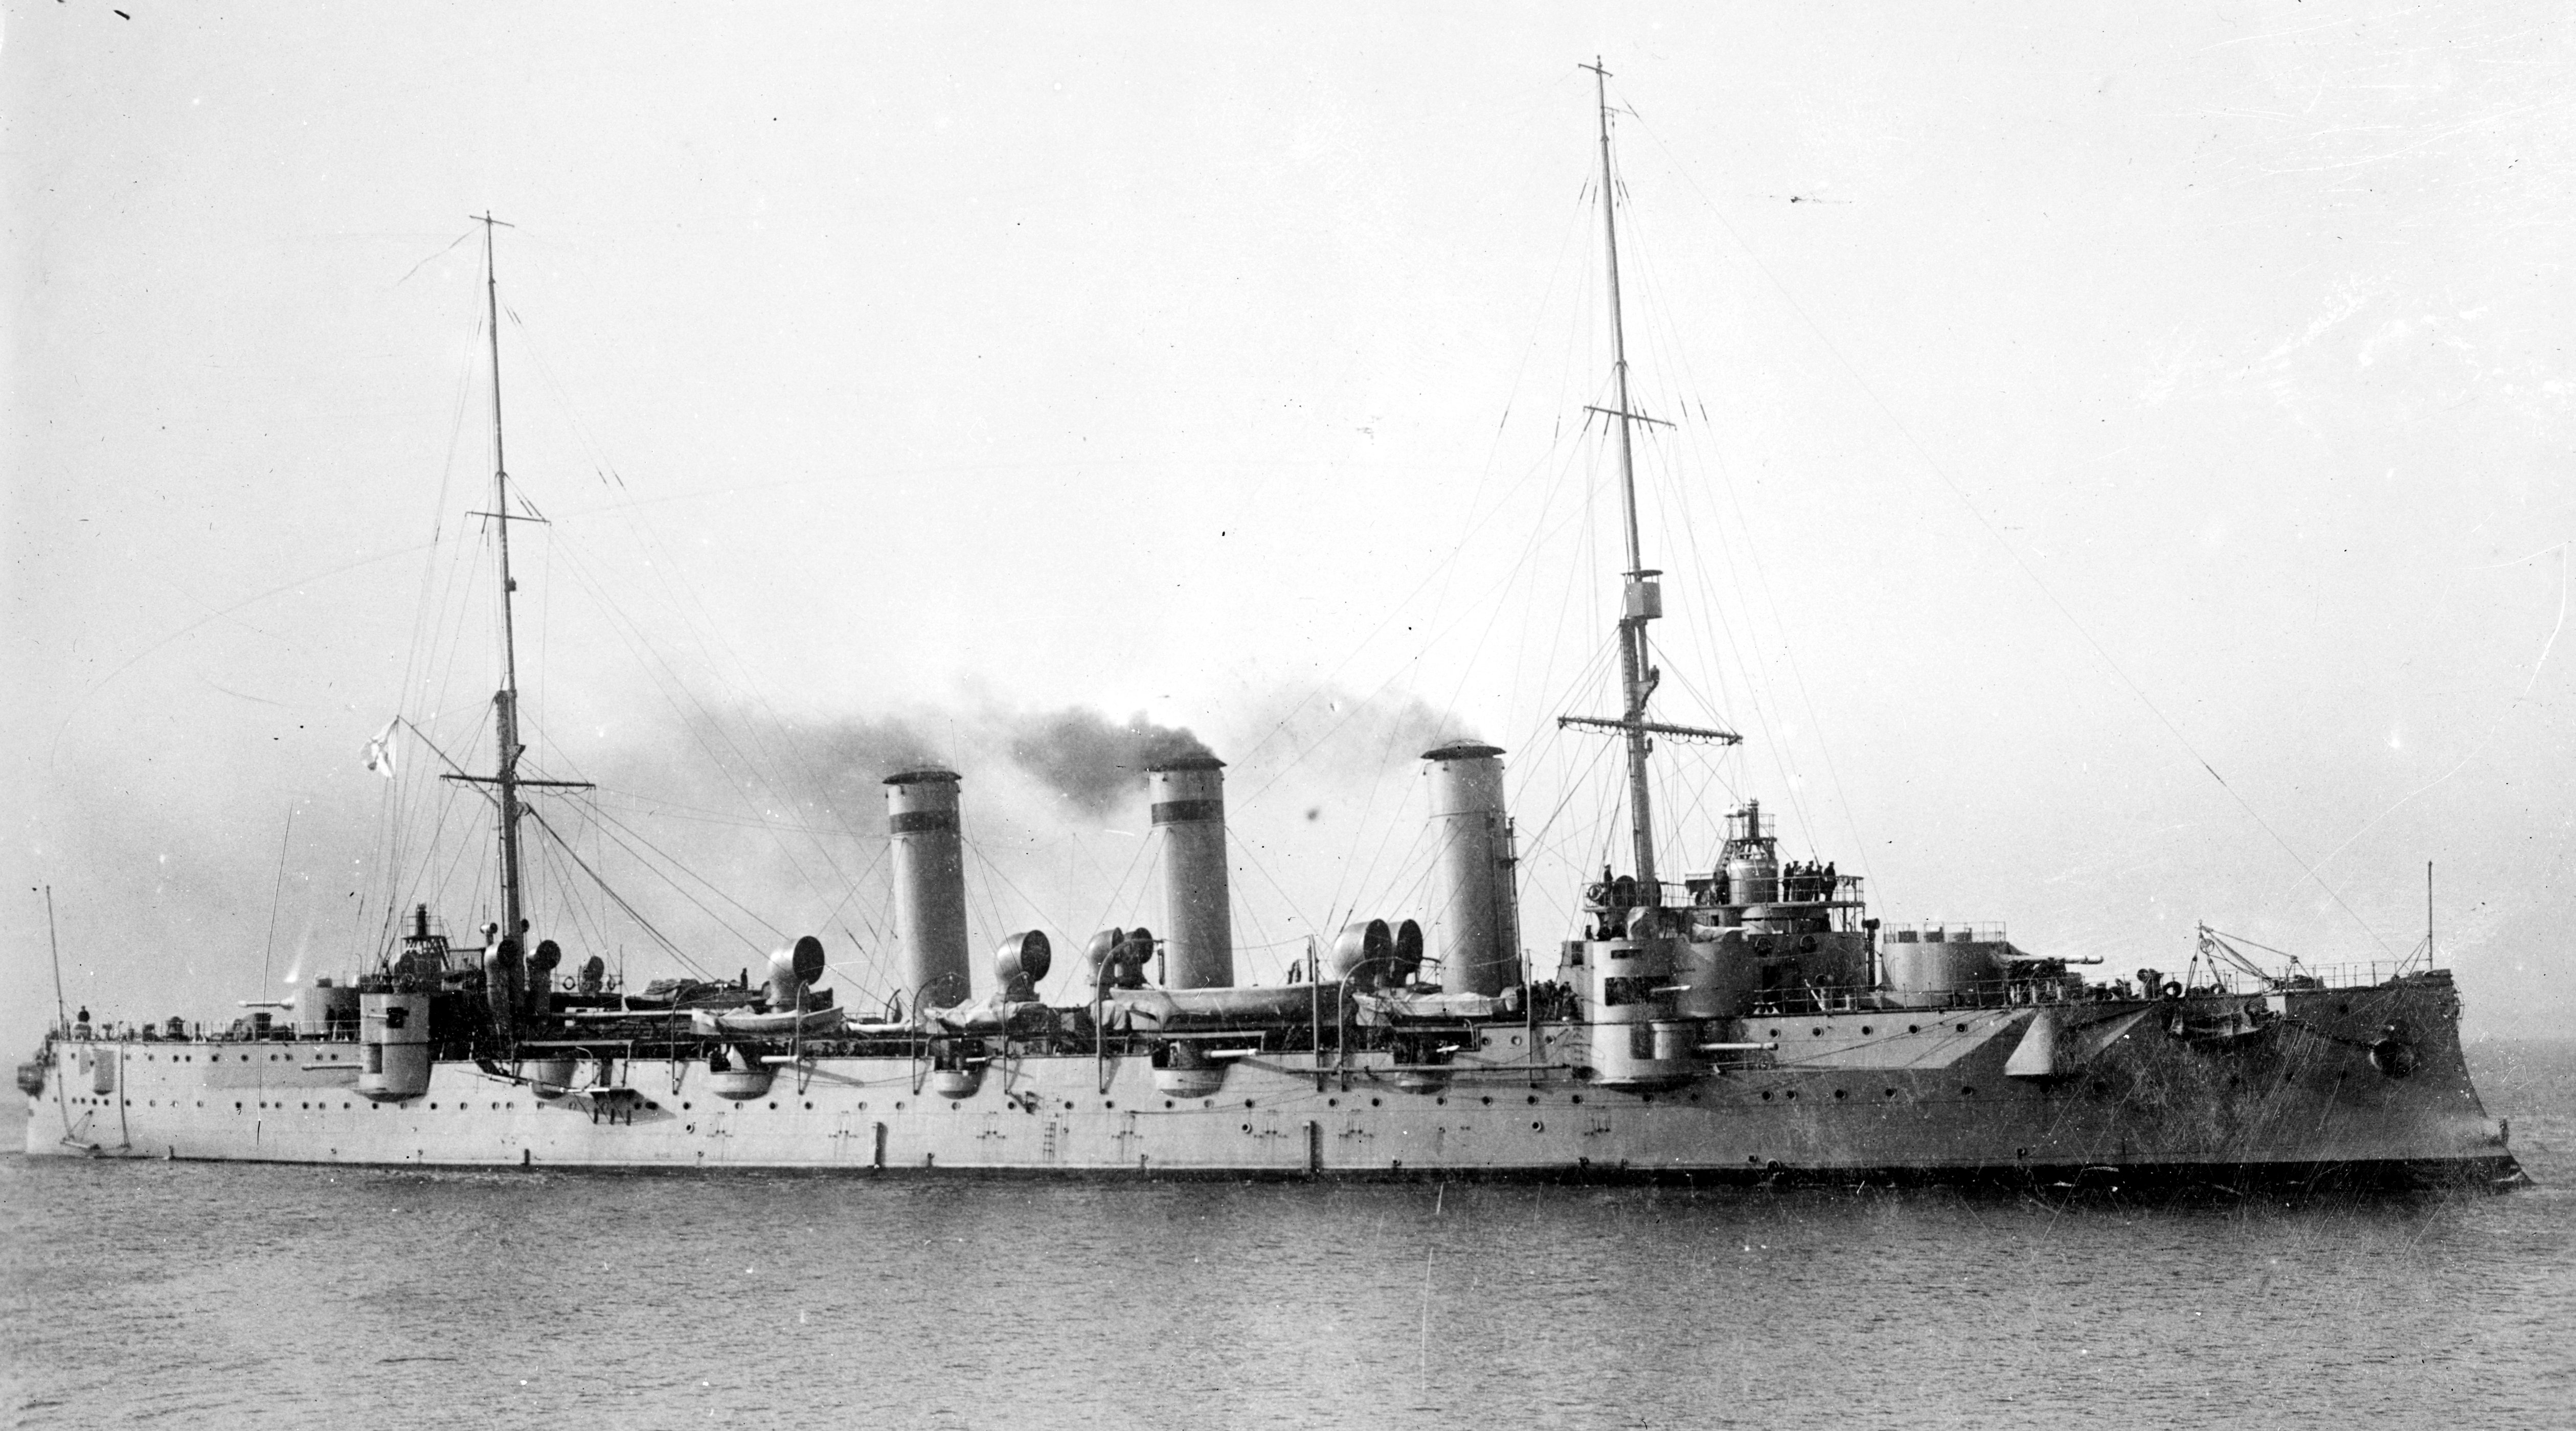
Russian Cruiser Oleg
On the morning of the 16th Lt Agar was once again on the Church tower. The two battleships had retired to Kronstadt but the heavy cruiser Oleg had taken their place. That night he decided to carry out his mission. Both CMB7 and CMB4 set out just after midnight. Due to their northern position, darkness at that time of year was only a few hours long. Shortly after setting out CMB7 hit a submerged object and sheared its propeller and rudder off. CMB4 towed the stricken boat back to harbour but by the time it was secured it was 0400 and the short night was over.


The following night the Oleg was still in position, so Lt Agar set out with the two other men of CMB4 to destroy the cruiser. A line of destroyers had formed a picket to protect the Oleg, Lt Agar swung round the extreme end of the picket line. As he was preparing to launch his attack disaster struck, Sub-Lieutenant Hampsheir stumbled and fired the cordite charge that launched the torpedo. Luckily, however, the torpedo was still tied down for travel, so it failed to launch. It bucked and strained at its bindings as the engine raced. Chief Officer Beeley quickly tackled the torpedo and brought it back under control. Chief Officer Beeley also repaired the firing mechanism with nothing more than a pair of pliers.

The damage had been done though as someone had heard the cordite charge going off, and searchlights began to sweep the area. As they probed closer Lt Agar brought CMB4 to a halt so the glowing white wake wouldn't give their position away. There they drifted while the others attempted to re-arm and re-prime the torpedo as the search lights drew nearer to them. Less than a mile away to the North lay the first destroyer of the picket line. About the same distance away to the south was the Bolshevik coast and its forts.
After about 5 minutes Sub Officer Beeley gave Lt Agar the thumbs up. Peering into the darkness Lt Agar could just about make out the cliff like side of the Oleg, ramming on full throttle he aimed CMB4 right down its throat.

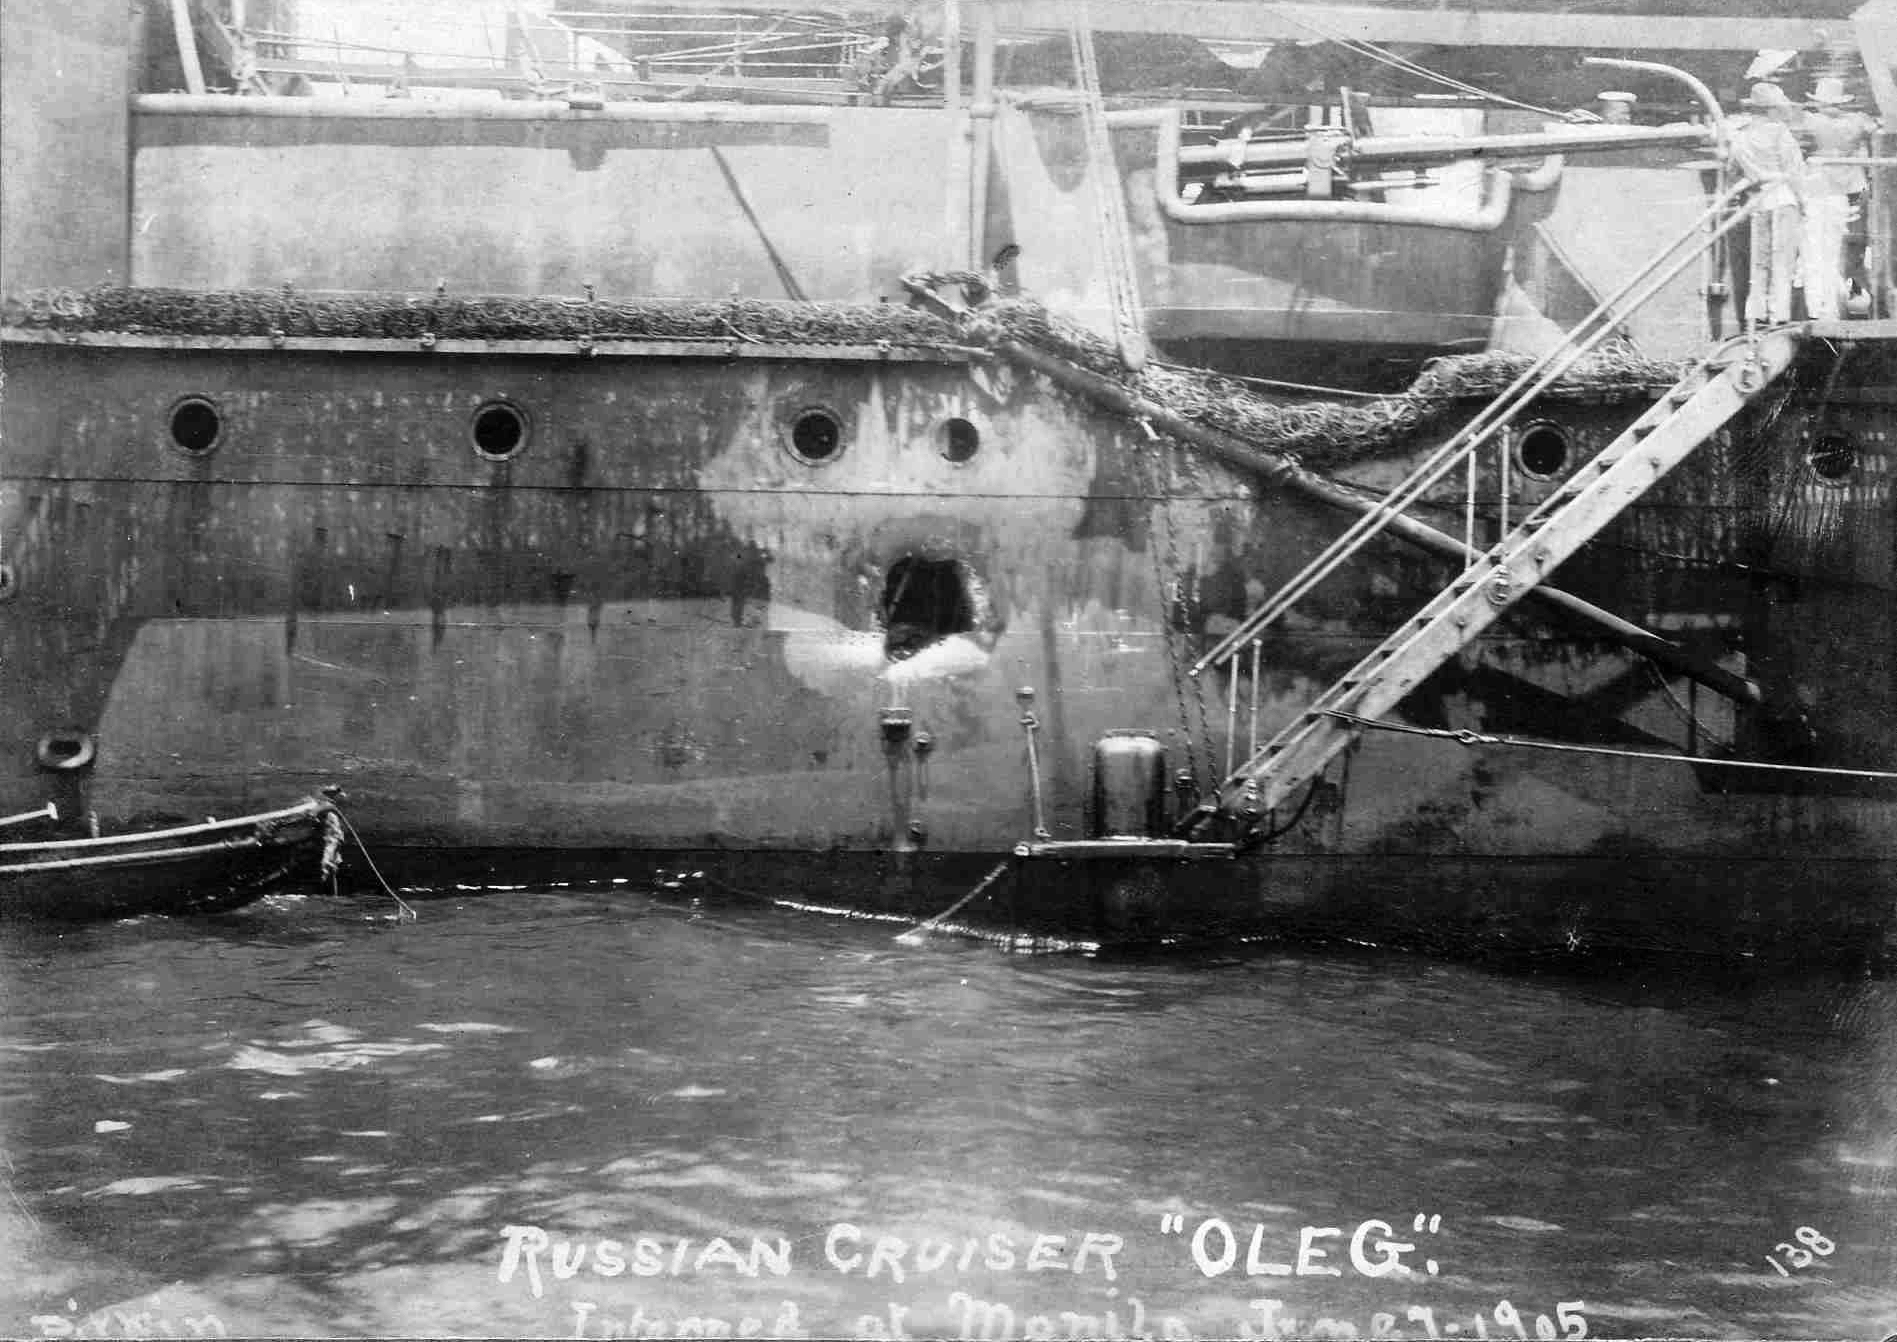
Oleg, after suffering damage against the Japanese in 1905
At Lt Agar's signal the torpedo charge was fired for a second time, this time the torpedo launched without a hitch. By now the wake of CMB4 had been spotted and as Lt Agar swung round in a huge turn at full speed everything the Bolsheviks could bring to bear was fired at them. Tracer fire from machine guns sleeted past, explosions from HE shells showered the boat. Throwing the wheel left and right to throw the gunners aim off CMB4 drew a brilliant line through the water, Lt Agar swerved through the picket line charging between the destroyers who were closing in on him, and neither was more than 200 meters away.

Then a huge explosion lights the night behind CMB4, the Oleg is illuminated, and a huge black cloud is blown out of the smoke stacks. When they arrive at Terijoki CMB4's crew are met by several people who were watching from the Church tower. It looks like the Oleg had been hit in the magazine and had sunk! That the Oleg had been sent to the bottom was confirmed the next day by an aircraft flying over the location of the ship.
That aircraft might also have seen the force of Bolshevik sailors assaulting the fortress of Krasnaya Gorka through the holes torn in its wall by the bombardment. Despite getting over run the defenders were able to use escape tunnels to retreat to Estonia.

CMB4 towed the damaged CMB7 to the RN Baltic fleet for repairs, as they entered the anchorage the decks of the ships were filled with cheering sailors. The crew of one destroyer held up a hand painted sign with the words "Giant Killers!" written on it.

Lt Agar turned to Beeley and said "So much for secrecy."

Lt Agar won the Victoria Cross for his actions, Sub Officer Beeley the Conspicuous Gallantry Medal and Sub-Lt Hampsheir a Distinguished Service Cross. CMB4 is currently on display at the Imperial War Museum Duxford.

Friday, January 17, 2014

3-year-old

Yesterday was the blog's birthday - kinda forgot that with all this shopping&entertainment business summit in Singapore. :)

It has been 3 years. 

Thank you for still stopping by. Promise to post when Blitz goes closed beta - hopefully, there will be reading players around.

Overlord

Sunday, January 12, 2014

Crocodile, Lets Go!

In early September the US army prepared for its assault on the Fortress of Brest. The city was held by elite German forces, and had been fortified like every other port in the Atlantic Wall. To capture it the United States attacked with the VII Corp. As the US Army stormed into the grinder, the US Generals realised their troops might need some specialist help, and so petitioned the British. From the north, over 400 miles away, a single squadron of tanks was loaded onto transporters. While heavy duty Mack trucks towed their trailers. These were the Crocodiles of B Squadron 141 Royal Armoured Corp.
Some of Brest's defences were based on old French forts. A line of these had been prepared and incorporated into the defences. One, Fort Montbarey, was unmanned and was captured on the 11th of September by US infantry. During the rest of the day the infantry suffered heavy shelling. Then a counter attack overnight threw the US infantry back. The Germans set up its positions and defended them by force. Two days later on the 14th the US 29th Infantry Division had prepared for a set piece attack, but by then the Germans were also prepared. Fort Montbarey consisted of three layers of defence. The outer layer was an anti-tank ditch 40 feet wide and 15 feet deep. Inside  that area was a mine field made out of 8" naval shells fused to explode on contact. The next line was more wire, earthworks and bunkers. Finally the fortress itself. A sunken road ran around  the fortress, with dragons teeth behind that. The walls were made of earth and masonry and were 25 feet thick. Studded with firing slits for small arms. The position was also covered by 20mm AA weapons, that could be depressed to rake the defences outside the fortress. There was also a sprinkling of anti-tank guns. The Defenders themselves were elite Fallschirmjager.
The night before the attack a company of US engineers undertook the deadly task of creating an opening in the minefield. Working in the pitch black they had to find and defuse the 8" shells. All the while avoiding German booby traps. On top of all this they had to do it in silence, lest they alert the defenders. By the morning of the 14th two lines of white tape lay on the ground marking a cleared path. The US infantry were the first to test the path. After they had advanced a troop of Crocodiles was ordered forward to support them. Almost immediately the second Crocodile in the column hit a mine, the driver was killed and the rest of the crew injured. The tank was knocked out as well and couldn't move, blocking the third crocodile. So the engineers returned to their task, creating another swept path around the wrecked tank.
The lead Crocodile continued forward keeping up with the infantry. With the Crocodiles help the infantry pushed forward and managed to get into the sunken road around the fort. The Crocodile began to shore up the position. Blasting apart German positions with its 75mm gun or burning those too stubborn for the gun. That Crocodile remained in action until it had used up all its 75mm ammunition, all of its fuel and almost all of its Besa ammunition. The Germans unable to tackle the Crocodile with the US infantry in close support, and unable to resist the Crocodile, began to surrender. With no more ammunition the Crocodile turned towards friendly lines to re-arm. Almost immediately it got stuck on a tank trap. Seeing their nemesis unable to hurt them, the German troops quickly re-considered and re-occupied their positions. By now things were looking bad for the battered US infantry, Then three more Churchill's arrived.

Unfortunately one fell into a shell hole, one got stuck on a tank trap and the other threw a track. Through out the rest of the day the Allied forces withdrew carefully, clearing the outer defence lines. They captured 122 prisoners on that day, which was over 50% of the defender's manpower. In addition they had knocked out two PAK 38 50mm guns and a 105mm gun. On the 15th the Allies prepared for another assault, eight Fighter bombers worked over the fortress, as did all the available artillery. Meanwhile other allied forces pushed round the flanks to isolate the fortress.

On the 16th the new plan was hatched. Under the cover of US tank destroyers, some Churchill MKV's and all the artillery the allies could lay their hands on a troop of Churchill's advanced on the Fortress. These then proceeded to scour the wall of the fort with fire, under the cover of this wall of flame a Churchill MKVII command tank advanced up to the fort's main gate. Its Commander was Colonel Roy Moss. Col Moss started knocking on the gate with his 75mm. After slamming a few rounds in three Germans emerged to surrender. Two were taken prisoner, while the third was sent back into the fort to ask the commander to surrender his position. Unsurprisingly the German officer refused.
A point blank fire-fight then followed. The US forces manhandled a 105mm howitzer up to the gate and began to pummel it with fire. Col Moss remained in position supporting the artillery piece, while there he was hit in the arm and badly wounded. Col Moss remained in his tank, in position plastering the German defences with fire. Two more troops of Crocodiles advanced on the fort. They began to blanket it with flames. US artillery began to fire HE and white phosphorus into the fort.
Inside the fortress everything was on fire. Out houses were engulfed. Pools of burning fuel from the Crocodiles were spewing clouds of smoke. Through this the concussion of explosives rippled. The defenders were in very real danger of suffocating from the smoke and fumes. Then in a corner they found a box of gas masks. Quickly donning these they survived the onslaught.
After firing 200 rounds from the 105mm aiming over open sights, there wasn't a front gate any more. The US engineers detonated demolition charges ripping open holes in the forts walls. "29, Lets go!" was the motto of the 29th Division, and as they stormed into the fortress they found between 40-80 coughing, breathless, stunned Germans awaiting to surrender. A few Die-hards remained at large in the fort but these were soon routed out.

It was only now that Col Moss, almost unconscious from loss of blood allowed himself to be carried from his scarred tank to receive medical treatment. The US Infantry had taken about 80 causalities on the 14th, but miraculously didn't even suffer one wounded on the 16th.

For his actions that day Col Moss was awarded the Bronze Star.

Friday, January 10, 2014

[WoT] Missions

Missions functionality has obviously been a great addition to World of Tanks. It has seen a few improvements since the initial implementation.

1. Do you like it now? What you don't like about it? How could the entire system be improved to be more useful?

2. What do you think about personalised missions, i.e. system that would track player's progress throughout the game (tanks researched and purchased, crew skills, etc) and offer unique missions based on that progress? In such a system, each player would always have a goal (or a few) to complete.

3. Missions could also be used for tutorial purposes to explain battle and garage mechanics. 

Sunday, January 5, 2014

Five days that saved a nation

After the First World War the British had taken over governance of most of the middle east, and slowly in the 1920's and 1930's the nations there became independent. After the Second World War the British having bankrupted themselves fighting Germany were slashing the number of military forces they maintained to save money, and so stated to speed up the plans to grant independence to Middle Eastern countries. One such area was the Mandate of Palestine.
During the preceding months before the end of the Mandate, anarchy erupted between the Jews and the Arabs. Many people on both sides were killed in the run up to the British withdrawal. Despite peace talks the situation became worse. Then on the 14th of May, 1948, the British Mandate ended. On the same day the Jewish leaders declared Independence of the state of Israel. The next day the Arab nations invaded. Today we shall have a look at one of those battles.
In the months running up to May 1948 unrest was so bad that most villages in Palestine had quite a large amount of defences and weapons. Equally the roads were very dangerous. The Palmach, fore runner to the Israeli Defence Force, ran supply convoys to many settlements. During the Passover holiday one such convoy reached the settlement of Yad Mordechai, bringing with it Matzo bread, as well as seven Czechoslovakian rifles for the inhabitants. This brought the defenders supplies of weapons up to 37 Rifles, four Sub-machine guns, two machine guns, two light mortars and a PIAT with three rounds.
The settlement itself was aligned South-west to North-east along the main road to Tel Aviv. Its defences were a central command post linked by communications trenches to ten sandbagged sangers around the perimeter fence. The sangers were laid out in a rounded U shape, with the open side of the U leading to a banana plantation on the south west side of settlement. About 300m from the settlement, on the other side of the plantation was a large pillbox.

On May the 15th the Egyptian army crossed the border and began to attack towards Tel Aviv in an attempt to crush the fledgling Israeli state. Two forces totalling 10,000 men, with all the elements of modern warfare, tanks, artillery and air support, began pushing up the roads. Nirim and Kfar Darom were the first two Jewish settlements they came to. The Egyptians attempted to seize both but were held at bay by the defenders. As neither settlement was in their way, they bypassed both and pressed on.

On May the 18th a pair of Spitfires from the Royal Egyptian Air Force made a bombing raid on Yad Mordechai. Realising that they might now be in the front line two of the defenders got hold of a jeep and made a run towards the nearest settlement, Kfar Darom. In part as a reconnaissance, in part to help evacuate the wounded. As they approached they found large Egyptian forces building up. Realising that the Egyptians had to seize an take Yad Mordechai, the two returned with the news of the impending threat. During the night a Palmach convoy arrived and evacuated all the non-combatants from the settlement, leaving about 100 fighters to hold Yad Mordechai.

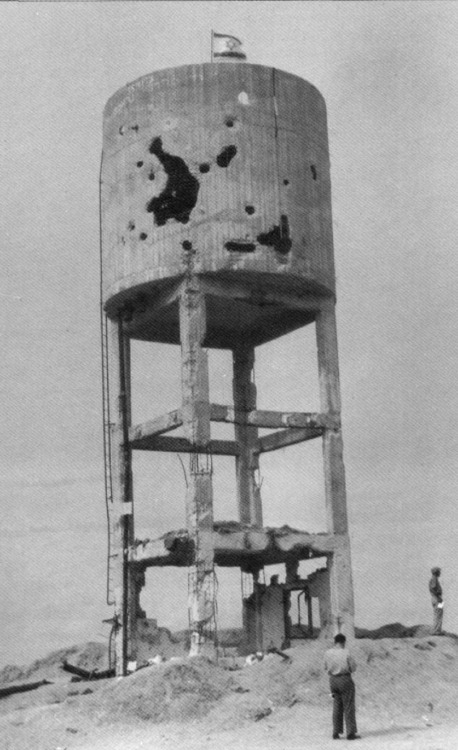
On the morning of the 19th the Egyptians started their attack, with an air strike. The planes showered the settlement with Incendiary bombs setting fire to fuel stores. The situation was made worse by artillery fire, which smashed the settlements water tower. 
In the strong-point the seven men defending the position could see the Egyptian army advancing towards them. As they closed the defenders opened fire, throwing the first wave back. The Egyptians brought up armoured cars armed with two pounder guns and began to hammer at the bunker. The Israeli's feared the two pounders, as the shells were described by one veteran as "[...] the red hot shot broke up as it travelled thus forming a fire ball that came at them slowly and with a frightening roar". The defenders threw back the second, and a third assault by Egyptian infantry.
The Egyptians launched a fourth attack. By now the pillbox was peppered with holes, the defenders Thompson sub-machine gun was out of ammunition, and the Bren was so low on rounds it was firing single shots. With little more than rifles the defenders waited until the Egyptians had closed right up with the Bunker then showered them with hand grenades. Most of the force was halted, but a party had managed to flank the bunker, and get into dead ground. With very little ammunition and an increasingly worsening situation the leader of the strong-point ordered his men to retreat back into the settlement.
Following the defenders the Egyptians ran into Sanger's #1 and #2. Both had good fields of fire, but for maximum effect the Commanders ordered their troops to hold fire. When the Egyptians reached the perimeter fence a mere ten meters from position #1 the Israeli's opened fire. Causing heavily casualties. Some Egyptians were forced to take cover behind hte bodies of their fallen friends by the withering salvoes.
Already the defenders supplies of ammunition were getting alarmingly low, so the defenders sent out scavenging parties to collect ammunition from the fallen Egyptians, included in the hall were another twelve PIAT rounds.

The next morning the Egyptians launched a series of attacks on position #1 and #2. Two Infantry Brigades attempted to force the perimeter line. Eight times the brigades attacked, covered by artillery and armoured car fire. The Israeli's pair of 2" mortars kept the armoured cars back, but left a vicious infantry fire-fight. However the defenders managed to hold on and force the Egyptians to fall back. After the last attack was thrown back and evening fell, the Israeli's counted their casualties. There are conflicting reports as to the scale of casualties. One gives the figure of 12 killed and 24 wounded, the other 24 killed and 20 wounded. Either was a significant portion of the defenders manpower now out of the fight. However darkness brought help as well. About 30 Palmach fighters arrived with more ammunition. They also brought the news that radio reports intercepted by the Israeli's had claimed about 300-400 casualties on the Egyptian side.
For the next two days the Egyptians shelled the settlement, constantly. Point blank direct fire from the captured strong-point was also brought to bear along with the artillery fire. Smashing the trench lines the defenders relied upon. During the 22nd under cover of the bombardment the Egyptians managed to push an armoured column along the road. However the bulk of the force couldn't use the same route unless Yad Mordechai was captured.

The 23rd was the final day of the siege. In the morning the Egyptians launched a diversionary attack on Position #10 facing the road on the east side of the settlement. At positions #1 and #2 a smoke screen was laid. When it cleared the defenders could see universal carriers and infantry advancing towards them. The carriers easily smashed the perimeter fence aside, and Infantry advanced into the Israeli line, capturing position #1.

From the banana plantation came another threat. A small force of men and as single Vickers light tank MKVIB pushed into the settlement. As far as I can tell this is the last time a Vickers Light tank saw action. Tanks are difficult to fight in up close, and very disorientating to their crew. The Vickers tank stopped just inside the settlement and began firing its machine gun. Against this bulwark the Israeli's couldn't counter attack to re-capture position #1. They opened fire at the tank with their PIAT, but couldn't score an effective hit. Some defenders attempted to destroy it with fortified grenades. These were two hand grenades tied to a charge of TNT.
Suddenly the tank lurched forward, its crew obviously not relishing the idea of sitting there and being buffeted by the explosions. As it pushed further into Yad Mordechai it bent the defenders line back. Suddenly, as it approached a chicken coup, a defender rushed out and charged the tank. He threw a fortified grenade that detonated beside the drivers vision slit. The Tank ground to a halt. As the unnamed defender attempted again to charge the tank he was hit and killed by a burst of machine gun fire.
The Egyptians tried to recover the tank by towing it away with a second tank. They may have gotten it out of the battlefield, but the tank itself was captured after the war by the Israeli's at a location near Yad Mordechai.

With the tank gone the defenders were able to launch a counter attack that included bitter hand to hand fighting. The attack managed to throw the Egyptians back for a final time.

By now the defenders were almost utterly unarmed, with only a few of their rifles still having ammunition, and even then only a few rounds each. The defence positions were also utterly smashed, more akin to shell holes than identifiable fortifications.

Equally the defenders themselves were utterly exhausted. Having been shelled, bombed and in constant action for five days straight, with little water in the hot summer sun. Knowing the desperation of the situation that night the Palmach sent out a column of ten improvised armoured trucks with ammunition and extra manpower.
The convoy was ambushed before it got close to the settlement. Three of the trucks did make it, but they had not been loaded with supplies. Upon realising the situation the Palmach convoy commander evacuated all the wounded he could carry. Meanwhile knowing that they had done all they could the rest of the defenders abandoned their settlement and retreated to friendly lines.

That there were friendly lines to fall back too was the main success of the defence. Before the war the Israeli's hadn't thought they would be attacked from Egypt, and so hadn't deployed any forces facing their border. If Yad Mordechai hadn't held the Egyptians would have made a clean breakthrough right into the heart of Israel, and we would be living in a very different world. As it was, the five days of resistance allowed the Israeli Defence Forces to establish a blocking force, and the rest is history.