Purpose of this blog

Dmitry Yudo aka Overlord, jack of all trades
David Lister aka Listy, Freelancer and Volunteer

Sunday, October 18, 2015

Timewarp

A couple of weekends ago my wife mentioned to me that a village called Holme was having a 1940's weekend. So we decided to take a trip down there. Here's some of the pictures I took. In truth it seemed to have a bit of a wider scope than just the 1940's with a large number of classic cars kicking around, and lots of reenactors. The other interesting thing that was the entire village was closed off and everyone in the village got dressed up, including one chap who amusingly was dressed as an undertaker complete with his tape measure!
It is I, Leclerc!
The reenactors and a few of the stalls had a large collection of firearms on display, so I dropped some hints about a SMLE Mk.III and birthdays, I have no idea if the wife was listening though.
No idea what this one is
Due to the quaint rural village feel and the lots of people dressed in period costume, there were quite a few opportunities if you were quick enough to get photographs that could have been taken in the 1940's.
Curse you Phone box for ruining the shot


One lady had a large collection of memorabilia which she'd selected some items from and laid out on a stall. One which caught my eye was this magazine, and the two page spread inside. Ignore what it says though, the Char 2C was never anywhere near the Germans.
As we strolled around the reenactors camp I did hear one German ask "Are we winning or losing today?" which made me chuckle. Later on there was meant to be a battle between the Germans and the Allies. Unfortunately we had been already been invited to a christening later so were unable to stay for the battle. I did suggest to my wife that she go to the christening then come back later to pick me up. This cunning and subtle plan was vetoed by the long haired CO.
As we were heading towards the car park there had been a few outbreaks of firing going on, we spotted this bunch of chaps in a field loosing off a few shots. They must have seen some Germans lurking in the bushes!
The good news is the wife enjoyed the day out. So it's likely we'll get back to another one and get a full day out of it, including the mock battle.

Some other pictures I took through the day:

Needs more armour plate.
Just can't see someone in this BMW driving like a modern one

Needs more armour plate

Sunday, October 11, 2015

The Caernarvon Conqueror

Sorry to turn this into another WOT related post, but again we need too. I must also stress this is just me thinking out loud for a few moments, it's not what will be happening, it might not even be the answer, but it's just some ideas I've had following on from the news.

On Rita's blog, including the Q&A several questions have been answered by Storm or SerB regarding the Caernarvon and the Action X turret, which they freely admit is a fantasy made up combo. Two of the quotes are:

 - Storm confirms that the Action X turret on Caernarvon hull is a WG fake, but there was no other way to increase the armor of the turret

- The solution for the Caernarvon (fake top turret) is not good but for now WG sees no other solution

 There are more, however I think you get the gist of it. That's what this post is about.

To put it simply the change from the standard to the HD model for the Centurion turret has not treated it kindly, reducing her armour by quite an appreciable amount. This in turn has had a knock on effect to the heavy tanks that use the turret. As you can see WG don't see a way out, the simple answer is because they are not well read in the field. This is by no means their fault, there's too much research to cover for even a small group.
However there are options, one that would get a premium tank out of it, and would be mostly historically accurate.
Gratuitous Conqueror picture
 At the moment we have three turrets in game, across several vehicles. The Centurion turret, the Conqueror turret and the improved Conqueror turret that I found.
Whilst I'm on that last point, as I discovered that turret I'm sure there's some law from the days of empire that allows me to name it, right? Well I've going to name it after my wife, and a friend has already worked out an acronym to allow me to do it: C.L.A.I.R.E: Conqueror Late Armour Improvement REdesign. The closest it's got to a name in the documents is a description of it, where they call it "unorthodox turret". I should point out that the above naming idea isn't popular amongst all the historians I talk to.

The later turret is currently meant for some "Super Conqueror" at tier 10. Regular readers will know that I've long argued for placing it as the elite turret on the tier nine Conqueror, with the current upgraded turret as the stock one. But doing so leaves us with an issue, as Wargaming want to use that as a tier ten tank. Well there is one other option. The files talk of a 1949 dated two man turret with an improved ballistic shape. This was achieved by removing the gunner, and giving that roll to the commander. With the gunner removed it allowed the current Conqueror turret design to be narrowed, meaning the armour improves quite a lot. As you can't change the number of crew in a tank when changing turrets this later one Wargaming could happily invent as there's no pictures or armour values.

So with the Conqueror solved, we come to the Caernarvon. Here's where we can make a premium. Turn the FV221 into a tier seven heavy tank premium, and replace it with a FV201. Hang on you're all yelling, isn't the FV201 already a tier seven premium? Yes, and no. Wargaming have modelled a very specific variant, which could easily be called the A45 as the premium. Every single document I've seen has the FV201 with a 20 pdr. The in game version has the 17 pdr.
 Now we come onto the advantages of this; Firstly the hull of the FV201 is already modelled and secondly one of the complaints levelled at the Caernarvon is that its fire-power is woeful. Well documents talk of fitting a 4.5 inch gun to the FV201, and it's a high velocity weapon as well. Equally if you still want more than three gun options then there's the FV202 AVRE with its 6.5 inch demolition gun. But what of the turret? Well we know what the FV201's turret looked like, externally very similar to the Centurions. But I've never seen an armour schematic, possibly because it wasn't fully designed. Again this leaves Wargaming leeway to alter the armour values as they deem fit. 
The ideas above are just thoughts I've had, and might not even work under closer scrutiny. But as an idea it bares a closer look, I think.

Sunday, October 4, 2015

Better than the Luftwaffe

Last week I wrote about the 340th Bomb Group on Corsica after its capture during Operation Vesuvius. Well since then it has moved across to Italy and is now flying from an airfield near Naples. The airfield is named after a nearby settlement, which goes by the name of Pompeii.
Towering above Pompeii and Naples is the volcano Vesuvius. With a height of about 1260m above sea level this volcano had been mostly quiet since the 5th of July 1913, emitting a small plume of white smoke from a conelet. This plume of smoke was no more than you might see from a factory chimney. The first indication something was happening was when the conelet collapsed on the 13th of March 1944.
At 1630 on the 18th of March a flow of lava burst from the conelet and flowed out of the volcano's crater and down the sides like a fiery waterfall. Where it met trees they burst into flames filling the night sky with a red glow. Advancing at a speed of around 10 miles an hour the lava flow was a wall 30ft high. Two reporters from the Advanced Press Headquarters took a portable transmitter and climbed up the volcano. They arrived at the town of San Sebastiano but the lava had reached this town at about 0100-0200 on the morning of the 21st. The veteran war reporters who later visited the town were shocked by the power and utter destruction which was more complete and effective than all the best of man’s explosives. Walking round the town it was utterly silent except for the crackle of flames and the pop and gurgle as the lava advanced. The black crust with white hot edges sluggishly crawled towards the buildings, radiated heat caused the buildings to catch fire when it approached. When the lava reached a building it would flow treacle like through windows and doors filling the building like a mould, then the pressure and heat would cause the building to collapse into the lava and it is gone for ever.
The lava flow engulfing a village
In the early morning of the 22nd the volcano's rumbling and explosions began to change. At about 0115 it began in the words of one eyewitness to sound like it was panting, followed by a large explosion. This cycle of events carried on with increased ferocity through the rest of the night. The next morning a giant plume of ash reached up into the sky. Slowly it spread over Pompeii airfield, and the planes of the 340th Bomb Group. From the plume hot ash fell much like the occurrence that had buried the famous village in 79AD.
The B-25 bombers on the airfield became weighted down with ash and tipped up on their tails. Elsewhere tents began to collapse. The heat of the ash burnt the fabric of the planes, and crazed and cracked the plexiglass canopies. About 78 to 88 planes were destroyed, more than the number knocked out by the best efforts of the Luftwaffe the previous year.

Most people under the cloud were wearing helmets or other head coverings, some even used saucepans to protect their heads from the larger lumps of falling rock. Some were injured when lava entered a water tank causing it to explode, and some were killed when their houses collapsed under the weight of the ash fall.

Reported casualties included some who died of asphyxia in the smog of ash and rock that formed afterwards, but within the 340th Bomb Group injuries were minimal apart from a few cuts and one man suffered a sprained wrist.


Image credits:
All the images came from this website, and the site owner has gotten together a huge collection from the eruption. If you want to see me then head there. I'd recommend you do.

Sunday, September 27, 2015

The Real Catch 22

In July 1943 Operation Vesuvius (remember that codename) liberated Corsica from German occupation. After its capture the US used it as an air base and began using it as an unsinkable aircraft carrier right off the coast of France and Italy. The 340th Bomb Group was one of the units deployed, this seems to have been the inspiration for one of the units bombardiers, one Joseph Heller. Heller famously wrote the novel Catch-22. Life was pretty relaxed on the island with sunny beaches to relax on between missions. The 340th was based at two airfields: Borgo-Poretta and Alesani.
US personnel enjoying the beaches on Corsica
 Overnight on 12-13th May 1944 at three and a half minutes to 2200 a single flare burst in the darkness over Borgo-Poretta at an altitude of 3000 meters. Heartbeats later a string of flares started bursting in a curve to the south and west encircling the base. At this point the ground defences began to wake up. The airfields defences began to squirt strings of tracer upwards, their only target was the flares, so they used these as an aiming point.

At 2200 the last of the flares appeared, the airfield was brightly lit, all the planes were clearly visible. Then came the first bomb. It was a canister of incendiaries which impacted in the middle of the field to act as a marker. Suddenly the air was filled with the sounds of Jumo engines, as the second wave of JU-88 bombers screamed in at 1200m altitude. The first wave had dropped the incendiaries. The second wave used high explosive bombs aiming for the aircraft. Suddenly a column of fire rose to several hundred meters, and formed a raging inferno, the bombs had hit the main fuel dump on the island. Then the night became still apart from the roar of flames as the Germans left.
On board the German planes they dived to sea level. As they flew away they could see the glow of the fires they left behind them. As it faded they climbed to about 3000m to clear the mountains and about an hour an half later they landed at Ghedi airfield, Italy. The exultant pilots filed their reports, and took a break, having a drink and a meal. By the time they'd finished their planes had been bombed back up.
They repeated their navigation, with the group assembling over Modena, the pathfinder aircraft leaving the group five minutes before the main party. They would drop down to about 150m over the Florence countryside. Over the sea they dropped even lower, to under 20m. The land behind, and the low approach path meant that the defenders radar couldn't pick them up on their approach. After skimming across the sea, passing Elba, the planes climbed up to 50m over the Corsican coast. This time their target was Alesani but they could see fires and damage they'd caused at Borgo-Poretta. Again they hit the target and made their way out, landing back home without loss, at just after 0600.
This was possibly the last offensive mass bombing raid of the Luftwaffe, 59 JU-88's were involved in the raid, and for no loss on the German side they destroyed and damaged about 65 planes and wiped out large stocks of fuel. US losses were 24 killed and 115 wounded.

Image credits:
http://www.warwingsart.com and http://www.reddog1944.com

For Further details and reading see this links:
www.reddog1944.com/May_12-13_1944_German_Raid_On_Alesan_Airbase.htm
 

Sunday, September 20, 2015

Wallace and Hardy

Last week I wrote about the battle of Galatas, and the actions of a MKVIB tank commander called Lieutenant Roy Farran, when we left him Lt Farran was in a hospital in Crete which had just been over run by the Germans and Lt Farran made a prisoner of war. He was moved from the makeshift field hospital to a dedicated POW hospital at Athens, which he promptly started trying to escape from. After several failures Lt Farran successfully made it out by crawling under the wire. He linked up with a group of other British and Commonwealth soldiers and after taking a loan of money from the Greeks, hired a small open topped boat and set out to cross the Mediterranean. Blown off course by storms, running out of water, and a soldier going mad with thirst were some of the issues that Lt Farran had to face. However after nine days the boat was rescued by a British destroyer. Lt Farran had a bar awarded to the Military Cross he won during the fighting at Crete.
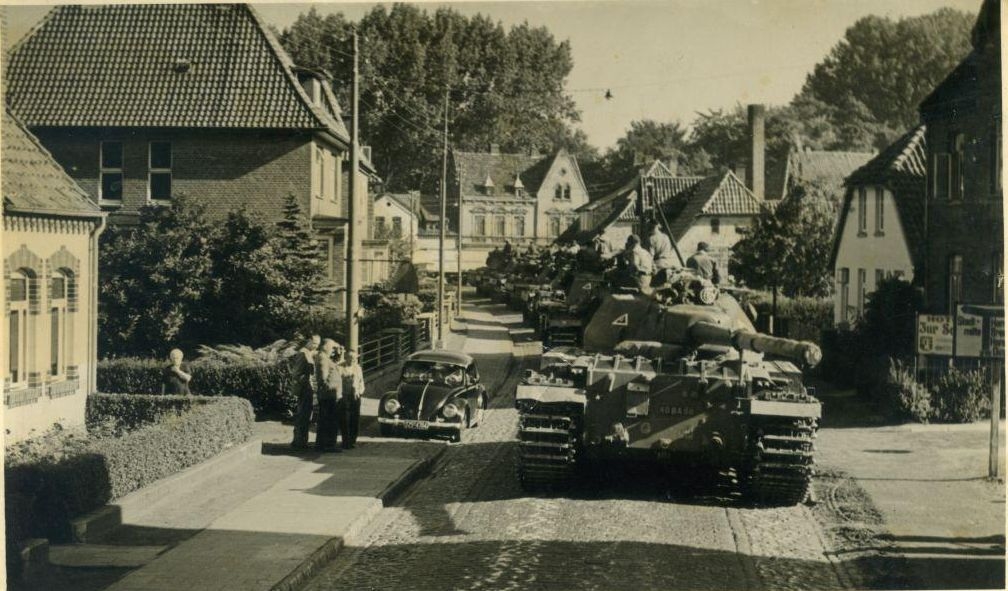
Lt Farran is the one sitting in the Jeep.
The next few years saw Lt Farran in several roles and eventually he was wounded and returned to the UK. However he was back in the desert in February 1943, where he met an officer by the name of Lieutenant Colonel Bill Stirling.
Lt Col Stirling was the brother of the founder of the SAS, and after training Farran joined 2 SAS, and was in action getting a second bar to his Military Cross.

By now the second front was well under way, and the Germans were being pushed back across France. The SAS saw an opportunity for raiding and mayhem on a grand scale and hampering the German war efforts. Farran, by now a Major, was landed at Rennes with sixty men and twenty Jeeps. These formed the core of Operation Wallace. They set off overland to link up with Operation Hardy, which had been dropped into the Chatillon forest area to set up a supply base to operate the Jeeps out of. 
The long overland trek had several hair raising moments including a German ambush which led to a fierce firefight lasting about an hour. At one point the Germans rushed the Jeep column, despite taking heavy casualties they made it into the British positions. Eventually the Jeeps withdrew. They had to drive very slowly along dry dirt roads lest the columns of dust kicked up alerted the Germans to their location. Days later as they approached the forest the column halted near a railway line. Suddenly a train heaved into sight. Major Farran ordered the train to be taken under fire. The engine was shredded by the columns Vickers K guns. These were lightweight guns used on aircraft, and so had a ferocious rate of fire. The train leaking steam shuddered to a halt. The SAS men engaged the German troops in the rear of the train while the French driver and stoker bailed out the front. After the Germans had been dealt with the French civilians stood talking to the SAS men as they watched the train burn.
After several raids including hitting a column of fuel trucks that burnt with some vigour Maj Farran and several of his offers were invited to a meal with the local Maquis Commander. Intelligence had been received by the French that the local German forces were changing units, and as such the local garrison was reduced to only 150 men. The Maquis promised 500 men to help with an attack. The attack was to be launched the next day, August the 30th 1944.

The plan was simple, place patrols at the two main crossroads in the area, then capture every crossroad heading to the market square. Then a group would form a blocking force to stop Germans attacking from the Château which was the garrison HQ. While all this was going on the forces single 3" mortar would bombard the château, then when the 500 Maquis would move in and help secure the town.
At about 0700 the mortar started firing the first of the 48 shells it would fire that day. The blocking force began to rake the Château's north side with Bren Gun fire. About fifteen minutes later a large column of German trucks approached the Montbard-Dijon Cross roads, which were in British hands. Sitting in the middle of the crossroads was a single SAS Jeep. The Germans obviously didn't recognise it as hostile, thinking that the local Maquis didn't have transport and so approached. When the column was within 20 yards the gunners on the Jeep opened fire. The hail of .303 set the first two trucks on fire, which as it happens were carrying ammunition. The detonation was such that a motorcycle with sidecar still on the bridge crashed through the barrier into the stream below. The SAS men, including Major Farran who was armed with a Bren Gun now opened up on the rest of the column causing heavy casualties. The battle raged for the rest of the morning with firing coming from all three sides of the town. Major Farran describes one memory he had of the fight:
"A pretty girl with long black hair wearing a bright red frock put her head out of a top window to give me a "V" Sign. Her smile ridiculed the bullets."
Other French civilians were doing what they could for the very few SAS causalities. However by mid morning the Germans began a serious push towards the town centre from the Château. The column that had been ambushed towards Montbard was also becoming more organised and bringing up reinforcements. The Maquis hadn't shown up, so Major Farran decided it was time to leave. He walked into the middle of the road, paused to wave to the French lady, and fired off two Very flares, the signal to withdraw.
There were further firefights throughout the rest of the day, across the surrounding countryside, including a second assault on the town itself, when a party of seven SAS men led 60 Maquis, who had been found waiting near by. However they came under an attack from a large force of Germans. Despite destroying the Germans armoured car they had to withdraw. Equally the war was not over for Major Farran, he fought back in Italy, including one operation where he'd been ordered to command his troops from the rear areas. He convinced the aircrew of the plane he was in to say he'd fallen out, then jumped with the rest of his men. He then raised a mixed force of British Italian partisans and freed Russian prisoners of war and led them in action in Italy.

After the war he was stationed at Palestine, where Jewish terrorists tried to frame him for the murder of a youth, by claiming the hat found at the scene of the crime had Farran's name tag on it. He was placed under arrest, despite an alibi, so he escaped to argue his cause to his superiors, then returned and was arrested again. Once again he escaped, but returned for his trial. At his trial a combination of lack of a body, Major Farran's alibi, and the fact all the eyewitnesses couldn't identify Major Farran in an ID parade meant he was acquitted.
The Jewish terrorists didn't take kindly to this, and Major Farran's younger brother was killed by a letter bomb sent to his home address.

After this Roy Farran led a full life living in Rhodesia and the UK before settling in Alberta Canada, where he became involved in politics. In 1996, aged 75 Roy Farran travelled to Zambia to follow the path of a cattle drive by one of his brothers just after the end of the war. During this he was held up by some rebels, and had a fight with a lion. As Roy Farran lived to the age of 85, I think we can assume he won both times.


Image credits:
www.m201.com, www.nevingtonwarmuseum.com, www.defensemedianetwork.com and www.my-crete-site.co.uk

Sunday, September 13, 2015

Galatas

In late May 1941 the Germans started the invasion of Crete with mostly light forces. What followed was a vicious campaign with a lot of bitter fighting and heavy losses on both sides. Late in the afternoon of the 25th of May the 100th Gebirgsjäger Regiment with close air support forced a scratch defensive force of Commonwealth troops out of the small village of Galatas.
Knowing the line was in trouble the commanding officer of the New Zealand forces facing Galatas decided to try and re-take the position with a hasty counterattack. At his disposal were two MKVIB light tanks and two companies of Maori infantry, against a dug in German force.  The two tanks were commanded by Lieutenant Roy Farran. A fair haired young officer, he had been born on January 2, 1921 in India. His father was a Warrant Officer in the RAF. The two MKVIB light tanks immediately on arrival at the front launched a headlong charge straight into Galatas as a form of reconnaissance. Machine guns blazing they swept in and out of the village, and when they returned from their dashing recce Lt Farran reported that the village was "...stiff with Germans". The two light tanks vulnerability was also highlighted as both the turret crew in the second tank had been wounded during the run through the village. When asked if he'd attack again, Lt Farran asked for volunteers to replace the wounded men, and two infantry who knew how to serve Vickers guns stepped forwards. Lt Farran gave them a quick briefing and some instruction while the infantry formed up.
The plan was simple, due to the speed with which the counter attack was organised. The two tanks would advance up the road to Galatas, with one each of the companies of infantry on each side of the road. The column would storm up the road and re-take the village. A runner was dispatched to the neighbouring battalion advising them to attack as soon as they could. With the tanks ready, the force moved off into the dusk.

The two VIB's raced ahead in a cloud of dust, the infantry companies began to chant Hakka's as they charged towards the nearest houses. Most were empty, and clearing them was losing the charges momentum. So the decision was made to not clear the houses and continue the advance. Ahead the machine guns from the two light tanks could be heard.

LT Farran had raced to the main square. Lt Farran describes what happened next:

"There was a blinding flash inside the tank and my gunner sank groaning to the bottom of the turret.  He said that he had been hit.  I felt a sort of burn in my thigh and thought it probable that I also had been wounded.  I told the driver to turn round, but as he swung broadside to the enemy we were hit again.  My driver was wounded in the shoulder and in consequence pulled the tiller too hard, putting us into the ditch.  We sat there, crouched in the bottom of the turret, while the anti-tank rifle carved big chunks out of the top.  I was hit twice more - in both legs and in the right arm.  Stannard, my gunner, was in a bad way, having stopped one in the stomach.  I pushed them both out through the driver's hatch and crawled out myself.  I pulled myself along on my elbows until I was under cover of a low stone wall. There I lay in the infernal din (for the Germans were still shooting bits out of the tank), praying for the New Zealanders."

Upon seeing the tank knocked out and in a very unfamiliar and frightening experience (being inside a tank in a street fight for the first time) the other MKVIB turned and ran. As it fled down the narrow streets it came across a platoon led by Lieutenant W.B. 'Sandy' Thomas. He leapt out in front of the oncoming tank and caused it to halt. After an argument with the commander Lt Thomas pulled out his pistol and threatened the driver with it. The driver, the only original tank crew member in the crew replied:
"I'm game sir, there's no need for that. It’s the bastard above who needs the pistol!"
The driver immediately began to rotate the tank, smashing the walls on either side of the road out of the way. The infantry man acting as the commander is reported to have clambered from the tank and fled screaming, only to be shot by a private.

As the second MKVIB advanced, a German NCO, leader of the HMG platoon, lurked in a doorway with a bundle of grenades.
Picture from Galatas
 As the tank drew parallel to him he leapt out of his hiding spot and raced towards the tank. The gunner saw him coming and started to turn the turret, spewing bullets from the Vickers .50. Just as the stream of heavy slugs was about to reach the German, he lobbed the bundle of grenades and dove behind a wall. The bundle of grenades landed on the ground wide of the tank, the Germans aim spoiled by being forced to duck.

The MKVIB halted his tank about five meters away from the building and began to saw it into chunks with both machine guns blasting away, while return fire sparked off his tank. As the Maori infantry rushed up behind him the Germans fell back from the position.
As they reached the square they could hear LT Farran yelling "Come on New Zealand!" and other words of encouragement. The Germans were firing from the other side of the square, fire sparking off the tank's armour. The infantry then launched a charge towards the Germans. As they began Lt Farran spotted a German on the roof and yelled a warning, however it was too late. The German’s grenade wounded Lt Thomas. The infantry were across the square quickly carrying the bayonet charge into the Germans. Under this relentless assault the Germans began to fall back. Eventually they were pushed all the way out of the village with heavy casualties. As the fighting moved away from the square the Germans began to land mortar rounds on it, believing the fighting was still going on there. While these rounds were falling the civilians of Galatas emerged to help the wounded bringing water and milk to the men.
Eventually all the wounded were evacuated back to a hospital, LT Farran was rescued by one of his own squadron's tanks. Whilst in the hospital Crete fell and LT Farran was captured. But for Lt Farran, the war was not over!

Image Credits:
www.nzhistory.net.nz, eng.world-war.ru and nzetc.victoria.ac.nz

Sunday, September 6, 2015

Paper Work

This week we’ll be doing two parts to the article. The first bit is history, the rest is World of tanks related. Also on Friday I put up a Name that tank picture. Answer at the bottom of the page.

First I wanted to share with you something thats missing from the historical record. the 15mm BESA is often given a pretty bad penetration number, which is somewhat unfair. Luckily I found some documents where the British did pretty extensive testing on the 15mm BESA. So here it is:


The Key:
  • Ammunition used: 15mm MK1-z
  • C immunity: the mean of the lowest Velocity to give a cracked bulge and that of the next lowest round which did not give a Cracked bulge
  • C/D: 50% of the rounds not to give a Cracked bulge
  • Ballistic Limits (BL): 50% of the rounds not to give bulges cracked so badly as to admit daylight.
  • W/R: Approximately 50% of the rounds estimated to be clean gun wins

So its likely the penetration figures give elsewhere are for 100% guaranteed penetration of the entire bullet. Which brings us onto the subject of what counts as a penetration? Well each nation measures a “penetration” on their testing differently, which makes comparing data difficult. Anyway, now to talk about WOT.


Last week in a Q&A Storm mentioned myself and British tanks. I'd love to set things right here as those Q&A entries were a bit off, and a case of mistaken identity.

First off the mistaken identity part. As it's easiest to clear this one up, and I don't like taking someone else's credit. One of the Q&A answers says this:

"- Storm later learns that it was Listy who measured the Chieftain and Conqueror for Wargaming and backs off a bit, it's possible the "Super Conqueror" will go somewhere else instead"

Well I've never ever measured a tank for Wargaming. I've taken some photographs of an airplane for Gaijin, but that's about as far as it goes. The people who could fit the description are to my knowledge: Xlucine, Ed Francis (Oh and go donate to his tank project!) or our very own Rita. My work has been entirely paper based and sifting documents.

Next we come onto the main meat of this article. This entry in the Q&A:

"- there were no other tier 10 British HT candidates than the Chieftain (a player was promoting Listy's "Super Conqueror" with improved armor, this was not considered: "Unfortunately, there's not a single word about armor, only the words of this guy (Listy) without any proof unless I am misreading it") "
I was going to make a comment about how I'd defer to Storm's superior experience in the days he's spent in the UK, visiting various archives. However I quickly realised that's not entirely fair. As by the sounds of it someone presented the wrong information. So here are the high points.

One tank often called the "Super Conqueror" is this thing:

The tank in the above picture was used for static target for shooting at with different projectiles. It was never suggested to be fielded as a combat tank.
However there are elements on the above that would have seen action against the Soviet tank horde crossing the inner German border. The part I'm referring to is the 14mm burster plates on the hull. These armour plates were manufactured and held at depots ready to be issued in case of war. They weren't issued all the time, because, as the Germans found out in the Second World war with the skirts on their tanks, spaced armour like that gets damaged easily. This would cost money, something the British Army has never had enough of.
 Other upgrades to the Conqueror was a proposed improved ballistic shape turret which I did discover in an archive. Storm asks about the armour values, so here they are:
 The original article also had the armour values in it I might add. Here is the turret drawing:
 
I've long been suggesting that the current top Conqueror turret becomes the stock turret, and this turret becomes the new elite one. As it solves the unpleasant situation where you have the Caernarvon to grind out a second time, only a tier higher.

There was one other modification to the Conqueror, one that I'm not so sure would fit in game, as I still believe the Conqueror to be properly balanced, (the gun handles far too well and can depress too far) with the earlier modifications would make a solid tier nine tank. The first few L11 120mm guns were fitted to Conquerors for testing.
So here’s what I would suggest for a Conqueror in game at the moment.
  • Reduce depression from 7.5 to its historical value of 5.5 degrees.
  • Severely nerf the dispersion bloom while moving. Watch any video of a Conqueror driving and you’ll see its gun barrel bounce around all over the place.
  • Add 14mm spaced armour to front hull (as per the photograph above)
  • Make current elite turret the stock turret
  • Add new elite turret in the shape of the improved ballistic turret.
So, Storm? How about it? Do you want a historically accurate tier 9 Conqueror, that is a heavy tank, and not a medium that scoffed all the pies? That is comfortable to drive, and not the same tank as the tier before with a new name and worse match maker until you’ve ground out the top turret and gun. Come talk to me! I can give you all the sources and references you need, my Facebook page with a contact Email is here.


Finally, the what is it quiz. Well it was a Vickers light tank as most of you guessed. In 1933 they produced a commercial tank that could be modified and sold around the world. Its had various names such as the MKIIIB "Dutchman" when a small batch destined for Holland was handed over to the British after the German invasion. However I think this particular version was the India Pattern one.

Edit: It's been pointed out I may have dropped a clanger on the Tank ID. The Upper hull structure looks more like a MKIII than the tank I picked. It came from a file about the one I pointed out, so I'll have to go back and check it when I'm next in the area.


Sunday, August 30, 2015

A Right Maur-ling

The Malayan campaign started on the opening of hostilities in December 1941. This long battle started with a Japanese invasion at one end, and ended with the surrender of Singapore at the other end of the peninsula two months later. However the Japanese didn't have it all their own way. In Mid January 1942 with the Japanese forces crashing down the length of the country the Commonwealth defenders decided to try a large scale ambush. The province of Maur was chosen for this plan, and as it turned out it was the last major battle of the Malayan campaign.

On the 14th of January at the Gemencheh bridge a large force of Australian Infantry was well dug alongside the road, in with artillery support. As the Japanese column approached the company of Australians let the advance guard pass their positions and cross over the bridge. Then as the main column crossed the bridge the Australians detonated their explosives, shredding the head of the column. This was the signal to pour fire into the column. Caught utterly unaware the Japanese column started taking heavy casualties.
However their advanced guard upon hearing the firing dismounted from their bicycles, and by a stroke of luck found the telephone wire that ran between the Australians and their supporting artillery, so the gunners played no part in the battle. Japanese artillery began to land on the column, further raising the damage done. After the Japanese withdrew, the Australians broke contact and retreated.

Elsewhere along the river the Japanese managed to flank the dug in Indian forces, defending the river bank by dragging several barges further along the river and crossing unopposed. With their flank gone the Indians were forced to retreat.
By the 17th of January an Australian force was in position blocking the Japanese advance. This force consisted of a battalion of Australian infantry and two anti-tank guns. It was further reinforced by three war correspondents. Which is where all the photographs in this piece come from.
The leader of the anti-tank guns was greeted by the battalion commander, and bluntly told:

"I have orders from the General that I should be accompanied by a troop of anti-tank guns, but as far as I am concerned, you’re not wanted.  I don’t want you to interfere with us in any way. I don’t expect the Japanese to use tanks, so for my part you can go home."

However the platoon leader ignored his orders and set up his anti-tank guns covering the road. The first was about 400 yards from a bend in the road, the other was 400 yards further back. After dark both sides tried probing attacks; a Commonwealth armoured car was sent forward, but encountered an enemy machine gun, a short while later a Japanese patrol was repulsed by the Australians. Then the Japanese put in a much larger night attack with quite a large amount of mortar fire in support. After some frantic fighting, some of it close quarters the Japanese were forced to retreat.
However in the dark after the attack a truck bringing rations up to the front line drove through the front without realising it. It ran straight into a Japanese machine gun and was quickly knocked out.

The next morning, the Australians stood too at 0530, at 0600 was first light. Then at 0645 the Japanese launched a major attack, lead this time by tanks. The commander of the lead gun held his fire until the tanks were almost on them, then let fly. His armour piercing shell flew flat and slammed into the side of the lead tank, and immediately the gun swivelled on its turntable to hit the second one. However the gun was a 2 pounder, and the targets were Type 95 Ha-Go's. The two pounder was a phenomenal gun, possibly one of the best of the early war period. The rounds just knifed straight through, although they blew some shrapnel out the other sides of the tanks and killed some Japanese infantry. Seeing this the gun commander ordered HE rounds to be loaded. The two tanks which had been hit continued forward, penetrating the Australian front line. The second gun opened fire and knocked both tanks out. Then Indian sappers climbed on the first three tanks, and pried open the hatches and dropped grenades inside. This might seem like overkill, however Japanese rules and regulations made it clear that tank crew could not abandon their tank in the face of the enemy and they had to keep fighting it as long as they were able to do so*.
Meanwhile at the first gun position the two pounder kept a steady stream of HE rounds pouring into the next three tanks. At such short range and against such light armour the HE rounds acted like an APHE round, punching through the armour before detonating inside. The gun commander was hit by enemy return fire in the hip after immobilising an enemy tank, but he remained at his station and the tanks were quickly knocked out.
Later on another three tanks tried to charge along the road, but met the same fate as the first five. At this point the Australians dropped several large trees onto the road to block any more tank assaults. Later on more Japanese infantry assaults were carried out, but all were repulsed.
With the situation in hand, the war reporters drew lots and then one of their number advanced forward to take the pictures you see in this article. While this was going on on the battalion commander returned to his headquarters to file his report. As a mode of transport he was riding pillion on a dispatch riders motorcycle. On his way back they were ambushed by Japanese infantry. Wounded just a few hundred yards short of the battalion he fell from the motorcycle. The dispatch rider gunned his engine and roared into camp.

The battalion sent out a Carrier to find and rescue their commander. As he lay there wounded the battalion commander asked to see the anti-tank troop commander, the one whom he had dismissed earlier.

"I’m so sorry that I acted as I did. Only for your persistence in defying my orders and positioning your guns where you did, there would have been wholesale slaughter”

The battalion commander died shortly afterwards of his injuries. The attack by the Japanese had been a holding attack, while that battle was raging they had infiltrated around the flank through thick jungle. With the Australian's position now cut off they had little chance, although they fought for several more days they were cut off. The survivors broke up into small detachments and filtered through the Japanese line before linking up with the main British force as they retreated further south.

Edit: Somewhere along the line I lost the footnote. So here it is.

*Japanese tank crew orders forbade dismounting in the face of the enemy under all circumstances. If the tank was disabled out of combat the orders were for the crew to dismount the tanks machine guns and continue the attack on foot.


Image credits:
Australian War Memorial via http://www.andrewwarland.com.au